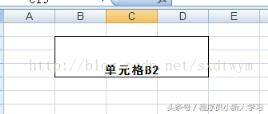
下边例子为创建造成一个excel,合并单元格,随后为合并后的单元格加上边框
- package test;
- import java.io.FileOutputStream;
- import java.io.IOException;
- import org.apache.poi.hssf.usermodel.HSSFCell;
- import org.apache.poi.hssf.usermodel.HSSFCellStyle;
- import org.apache.poi.hssf.usermodel.HSSFRow;
- import org.apache.poi.hssf.usermodel.HSSFSheet;
- import org.apache.poi.hssf.usermodel.HSSFWorkbook;
- import org.apache.poi.ss.usermodel.BorderStyle;
- import org.apache.poi.ss.usermodel.Font;
- import org.apache.poi.ss.usermodel.HorizontalAlignment;
- import org.apache.poi.ss.util.CellRangeAddress;
- import org.apache.poi.ss.util.RegionUtil;
- public class ExcelPoiTest {
- public static void main(String[] args) {
- HSSFWorkbook workbook = new HSSFWorkbook(); // 创建一个excel
- // excel形成全过程: excel–>sheet–>row–>cell
- HSSFSheet sheet = workbook.createSheet(“test”); // 为excel创建一个名叫test的sheet页
- HSSFRow row = sheet.createRow(1); // 创建一行,主要参数2表明第一行
- HSSFCell cellB2 = row.createCell(1); // 在B2部位创建一个单元格
- HSSFCell cellB3 = row.createCell(2); // 在B3位置创建一个单元格
- cellB2.setCellValue(“单元格B2”); // B2单元格添充內容
- cellB3.setCellValue(“单元格B3”); // B3单元格添充內容
- HSSFCellStyle cellStyle = workbook.createCellStyle(); // 单元格款式
- Font fontStyle = workbook.createFont(); // 字体效果
- fontStyle.setBold(true); // 字体加粗
- fontStyle.setFontName(“黑体字”); // 字体样式
- fontStyle.setFontHeightInPoints((short) 11); // 尺寸
- // 将字体效果加上到单元格款式中
- cellStyle.setFont(fontStyle);
- // 边框,垂直居中
- cellStyle.setAlignment(HorizontalAlignment.CENTER);
- cellStyle.setBorderBottom(BorderStyle.THIN);
- cellStyle.setBorderLeft(BorderStyle.THIN);
- cellStyle.setBorderRight(BorderStyle.THIN);
- cellStyle.setBorderTop(BorderStyle.THIN);
- cellB2.setCellStyle(cellStyle); // 为B2单元格加上款式
- // 合并单元格
- CellRangeAddress cra =new CellRangeAddress(1, 3, 1, 3); // 开始行, 停止行, 开始列, 停止列
- sheet.addMergedRegion(cra);
- // 应用RegionUtil类为合并后的单元格加上边框
- RegionUtil.setBorderBottom(1, cra, sheet); // 下边框
- RegionUtil.setBorderLeft(1, cra, sheet); // 左边框
- RegionUtil.setBorderRight(1, cra, sheet); // 有边框
- RegionUtil.setBorderTop(1, cra, sheet); // 上边框
- // 导出到当地
- String excelName = “/myExcel.xls”;
- FileOutputStream out = null;
- try {
- out = new FileOutputStream(excelName);
- workbook.write(out);
- out.flush();
- out.close();
- } catch (Exception e) {
- e.printStackTrace();
- } finally {
- if (out != null)
- try {
- out.close();
- } catch (IOException e) {
- e.printStackTrace();
- }
- out = null;
- }
- }
- }
形成的excel款式为

简易表明:
1.excel形成全过程: excel–>sheet–>row–>cell 2.数据库索引从0逐渐
3.合并单元格后保存最左上方的单元格(B3单元格被B2单元格遮盖)
4.合并后单元格边框根据RegionUtil设定,假如删掉下列编码
- // 应用RegionUtil类为合并后的单元格加上边框
- RegionUtil.setBorderBottom(1, cra, sheet); // 下边框
- RegionUtil.setBorderLeft(1, cra, sheet); // 左边框
- RegionUtil.setBorderRight(1, cra, sheet); // 有边框
- RegionUtil.setBorderTop(1, cra, sheet); // 上边框
实际效果为:

可以看到仅有B2单元格有边框。
版权声明:本文内容由互联网用户自发贡献,该文观点仅代表作者本人。本站仅提供信息存储空间服务,不拥有所有权,不承担相关法律责任。如发现本站有涉嫌抄袭侵权/违法违规的内容, 请发送邮件至 举报,一经查实,本站将立刻删除。


